How may we help you?

Edge Solo

Account Creation and Product Activation

Thank you for choosing Antelope Audio!

The activation of an Edge microphone is a mandatory process that must be completed once you receive your product. It is needed to validate your product warranty and to gain access to the microphone emulations. To activate your product, please make sure to follow the instructions listed. Bear in mind that an internet connection is required for successful product activation.

Before continuing, please take note the Edge line of microphones is best suited to work with an Antelope Audio interface with Discrete preamps. This will provides the following benefits to your workflow:

1. Onboard processing – you will be able to use the microphone emulations during real-time monitoring with zero CPU load.

2. Discrete preamp architecture – designed to complement the characteristics of the Edge microphones for improved sonic quality during recording.

Bear in mind that redeeming the code for native use of the microphone emulations – with or without an Antelope Audio interface  – requires an iLok (gen.2 or later) USB hardware dongle sold separately and the iLok License Manager software to manage the authorization. Having an iLok USB hardware dongle allows you to carry your microphone emulation licenses on a physical drive wherever you may be using them. 


DOWNLOAD THE EDGE MICS USER MANUAL


Step 1: Login/Create an Antelope Audio User Account

Open your internet browser and navigate to https://antelopeaudio.com/login/. Log into to your Antelope Audio user account with your email and password. If you don’t have an account, visit https://antelopeaudio.com/sign-up/ to create one – make sure to confirm your registration via the email you have received.


Step 2: Edge Microphone Activation

Once you have logged in, click on "My Account" in the top-right to access your user dashboard on https://antelopeaudio.com/.


Click on the "Activate New Device" button.


Choose your Edge microphone model from the device list. All current modeling microphones are under the "Modeling Mics" section, while the original (now legacy) Edge Mic" is under the "Legacy Devices section". 


After selecting your device, enter the 13-digit serial number which you can find on a small sticker in the base of your microphone.


After confirming the activation of the device, it is time to download and install the Antelope Launcher. This is needed to pair the microphone emulations with an Antelope Audio interface and download them as native effects. The following screen will appear.

Step 3 (Antelope Audio Interface Owners Only): Pair the Microphone Emulations

Download the Antelope Launcher for macOS or Windows. After installing the Launcher application, open it and click on the "Login" button. Enter the email and password you used to log into the Antelope Audio's "My Account" area and click Login.


The microphone emulations can be paired with a single audio interface at a time. If you own multiple Antelope Audio interfaces, choose one interface you would like to have the microphone emulations paired with and click on "Manage Device" box under your "DEVICE ID".

In the Antelope Registration Wizard window, choose "Features and Ownership", place a checkmark next to Edge Note Mic Emulations, and click on "Assing" button.


This will pair the microphone emulations with the audio interface which will allow you to apply them in real-time with near-zero latency from the Control Panel of your interface. Click Done and the pairing is finished. 

Step 4: Redeem the Code for the Native Microphone Emulations

If you want to use the microphone emulations as native effects in your DAW and for all users without Antelope Audio interface, you will require iLok (gen. 2 or later) hardware dongle. To do this, visit www.ilok.com to download and install the iLok Licence Manager Software. Insert the hardware dongle into a USB port in your computer and launch the iLok License Manager Software. Click on "Sign In" or on the small icon shown in red below, and enter your account credentials – if you do not have an account, you will be required to create one from www.ilok.com.


Click Licenses > Redeem Activation Code in the top left corner.


You will be required to enter the iLok code for the native microphone emulations pack. You can find it in the My Software section of your www.antelopeaudio.com user account dashboard. Navigate to the emulations pack, and click "Download DAW effect".


Copy the code, and paste it in the iLok License Manager box.


Step 5: Installing the Native Mic Emulations on Your Computer

Start the Antelope Launcher and navigate to the "Plug-Ins" tab. Select your Edge microphone, place a checkmark in the empty field and press "Update" button in the bottom-left corner. This will install the latest version of the software for your microphone.


In the following screen, you have the option to install the 32-bit plugins. Select your desired format, choose a location and press "Done".


System Requirements

Mac:

• Minimum: MacOS 10.14 Mojave. Recommended: MacOS 11.02 Big Sur
• Available storage space: Minimum 4 GB
• Memory (RAM): 4 GB minimum (8 GB or more recommended)

Windows:

• Windows 10 (64-bit) with latest Microsoft Updates
• Available storage space: Minimum 4 GB
• Memory (RAM): 4 GB minimum (8 GB or more recommended)
• CPU: Intel Core i3™ or AMD FX (Higher recommended)

Additional Information:

• iLok (gen 2 or later) USB hardware dongle is required for native use of the emulations
• A stable internet connection is required to download and update your Antelope Audio Software

DOWNLOAD THE EDGE MICS USER MANUAL

______________________________________________________________________________________________


Learn how to record with your Edge modeling microphone and apply the emulations during mixing stage:


Downloads

In this article you can find the download link for your antelope device as well as links to all video tutorials.


DOWNLOADS                               VIDEO TUTORIALS                         USER MANUAL

Edge Solo Mic emulations availability

The Edge Solo microphone emulations are currently available in the software control panel of the following Antelope interfaces:

  • Zen Go SC USB
  • Zen Go SC Thunderbolt 
  • Zen Q SC USB
  • Zen Q SC Thunderbolt
  • Zen Quadro SC
  • Zen Tour 
  • Zen Tour SC
  • Orion Studio rev.2017
  • Orion Studio SC
  • Discrete 4 (Gen.1)
  • Discrete 4 SC
  • Discrete 4 Pro SC
  • Discrete 8 (Gen.1)
  • Discrete 8 SC
  • Discrete 8 Pro SC
  • Goliath
  • Goliath HD
  • Goliath HD Gen.3


Make sure you have installed the latest available bundle update for your Antelope interface via the Antelope Launcher.


The microphone emulations, as a native plug-in, are available for installation directly from the Antelope Launcher under the "Plug-ins"  section. The following plug-in formats are supported:

  • Windows: VST3, AAX

  • macOS: VST3, AU, AAX


System Requirements:


Mac: 

  • Apple Mac 2013 or newer 

  • Minimum: Mac OS 10.14 Mojave. 

  • Available storage space: Minimum 4 GB

  • Memory (RAM): 4 GB minimum (8 GB or more recommended)

  • Supported macOS: Mojave (10.14), Catalina (10.15), Big Sur (11), Monterey (12), Ventura (13), Sonoma (14), Sequoia (15).

  • Supported for M1/M2/M3/M4 and Intel.


Windows: 

  • PC computer with USB2.0, USB3.0 or Thunderbolt 2™, Thunderbolt 3™ or Thunderbolt 4™ ports 

  • Windows 10/11 (64-bit) with the latest Microsoft Updates

  • Available storage space: Minimum 4 GB

  • Memory (RAM): 4 GB minimum (8 GB or more recommended) 

  • CPU: Minimum Intel Core i3™ or AMD Ryzen (Higher recommended) 

Connecting Edge Solo Microphone to an interface Enabling Mic Emulations

This concise guide will teach you how to seamlessly connect the Edge Solo microphone to an interface by choice to ensure a seamless setup, complete with microphone emulations, for optimal sound quality and versatility.


For explanation purposes we are going to make the mic emulations available on Orion Studio Synergy Core. 


Step 1: Account Setup


Create your Antelope Audio account on our website. This account is pivotal for hardware activation and feature 
access.


Step 2: Activate Edge Solo Microphone


Log in and access your user dashboard. Click "Activate New Device", then select "Edge Solo" and enter it's 
serial number.


Step 3: Mic Emulation Assignment

Assign the mic emulations to your device (The Orion Studio Synergy in this example):

   a) Open the Antelope Launcher application on your computer and log in your Antelope account with your credential;
   b) On the ''Devices'' page click on ''Manage Device'' button underneath your "DEVICE ID":
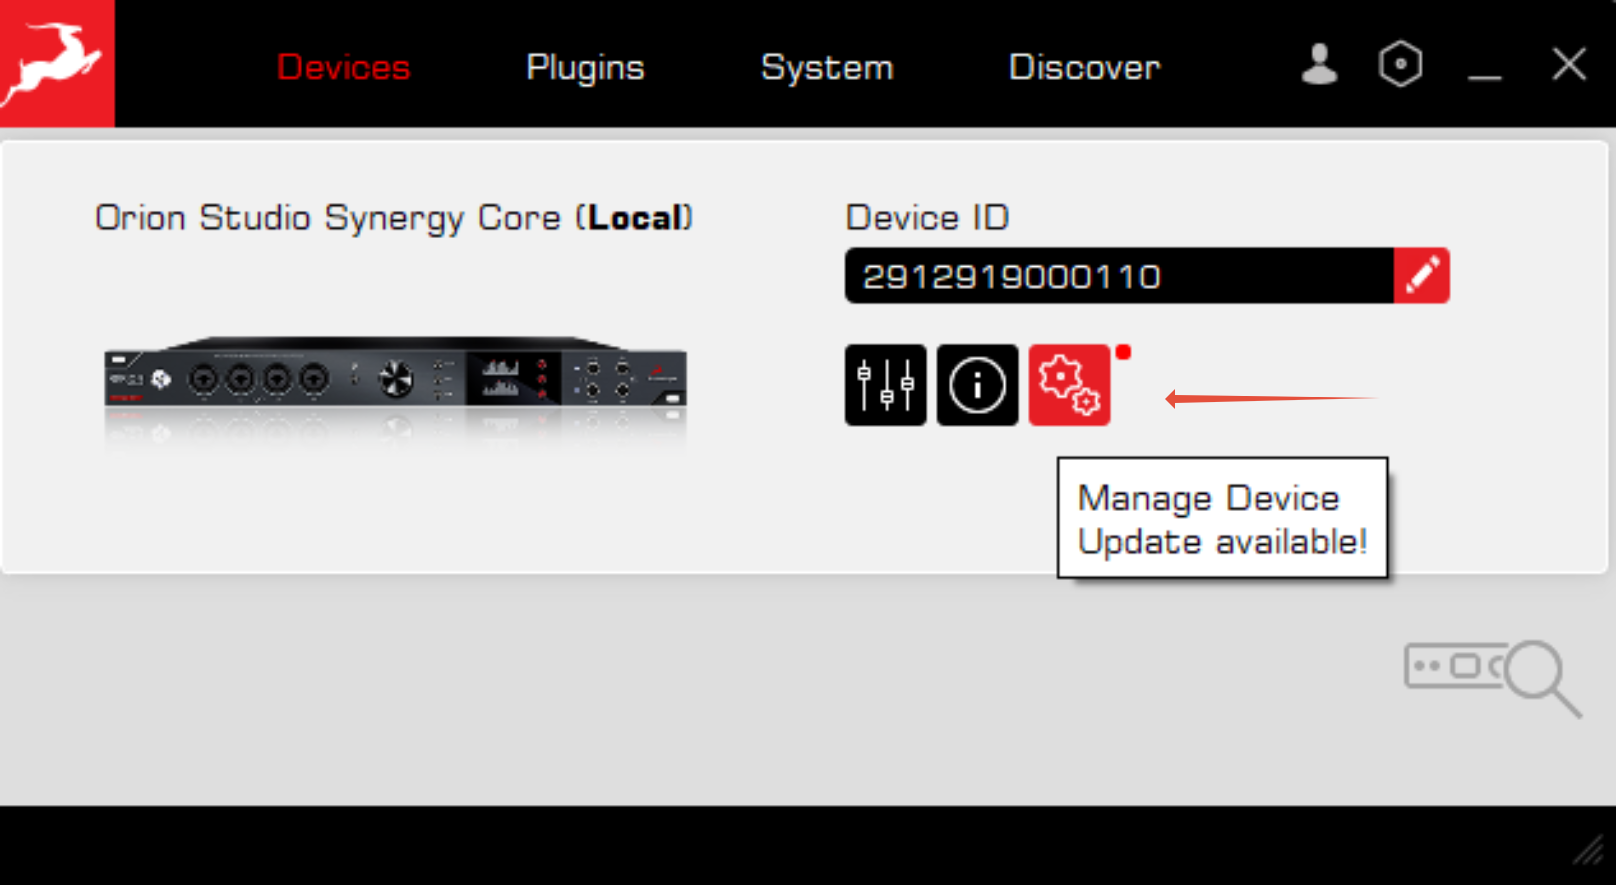
   c) Click on "Features & Ownership".
   d) Put a check on the Edge Solo Mic Emulations' checkbox as shown in the picture below and click on "Apply" after:


Step 4: Connecting the Mic

Use a standard XLR to XLR cable to directly connect the Edge Solo Microphone to any XLR input on the Orion Studio Synergy Core.


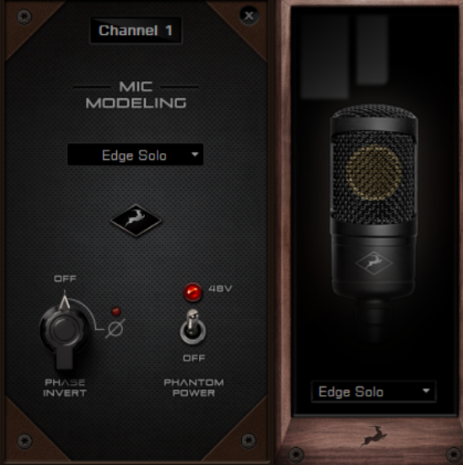
Step 5: Phantom Power Activation and Emulation Access

Open Orion Studio's software control panel. Engage the 48V phantom power by pressing the "48V" button on the input the microphone is connected to. To access the Edge Solo Mic Emulations, click the on the “Mic” icon (pointed with the red arrow below):


Now in the dropdown menu select "Edge Solo". A new window will appear on the right. From there by clicking on the dropdown menu you will be able to select any microphone emulation you would like to use during recordings.


Step 6: Efficient Routing


Route the emulated input signal to be record in your DAW or to monitor it.
 
When a microphone emulation is being selected on the preamp, the microphone is connected to, the processed signal with the applied emulations will be routable via the EMU MIC boxes in the routing matrix. 


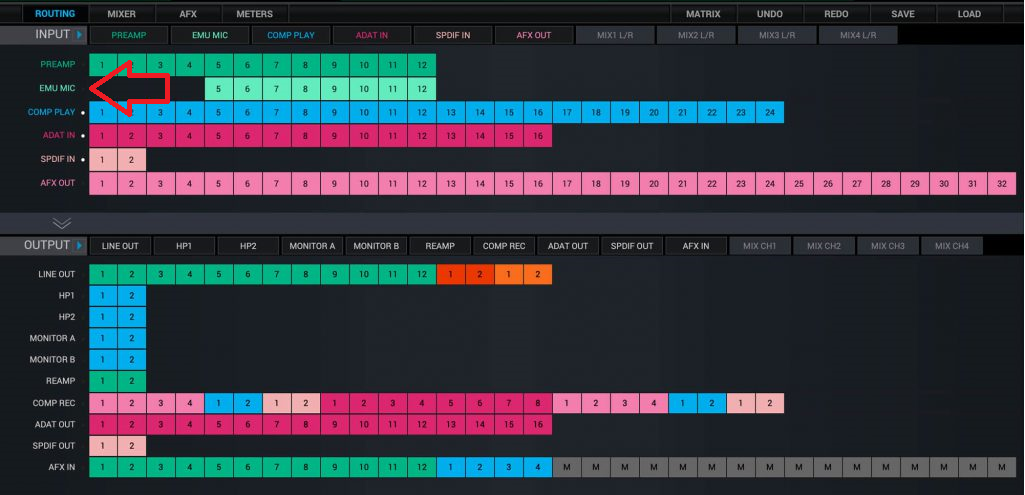
For example, if the microphone is connected to Preamp 5 and you have applied mic emulation on this channel, the processed input audio will be on EMU MIC channel 5.


After that you can route EMU MIC channel 5 to "Comp Rec" channel 5 to record it in your DAW. 

To monitor the processed input signal with the applied mic emulation route EMU MIC channel 5 to a summing mixer by choice or route the channel directly to an output of choice.


* For user using: Zen Go SC USB, Zen Go SC TB, Zen Q SC USB, Zen Q SC TB, Zen Quadro SC, Discrete 4, Discrete 4 SC, Discrete 4 Pro SC, Discrete 8, Discrete 8 SC or Discrete 8 Pro SC - the same logic applies for these interfaces as well. 


1. Connect the Edge Solo microphone to an XLR input of your interface by choice.

2. Pair the Mic Emulations with your interface from Manage Device -> Features & Ownership section in the Antelope Launcher once you log in your Antelope account.

3. Run the software control panel of your interface and turn on the phantom power of the used mic input.

4. Click on the mic icon and select the Edge Solo from the dropdown menu. 

5. Apply a mic emulation by choice from the lower-right dropdown menu. 

6. Select "MONITOR/HP1" mixer in your interface's software control panel. Instead of selecting the used preamp with applied emulations as "Preamp X" in the mixer, select it as "EMU MIC X", where "X" is the input your microphone is using.

7. After that record the EMU MIC X into your DAW. If EMU MIC X is the first channel in your mixer, select "In 1" in your DAW. 

8. To monitor the EMU MIC X with the applied emulations, simply switch between different mixers "MONITOR/HP1"/"HP2"/"LINE OUT" and turn the fader of EMU MIC X up.